
The below explores one method of locating the routine responsible for reading text in a NES rom. The game used is the Japanese version of Bio Senshi Dan, if you want to follow along. I've personally used this method a couple of times with a fairly high success rate.
Before we get started, you're going to want to have a couple reference documents on hand. First up is y0shi's NESTECH for the NES's hardware registers, which you can get from Romhacking.net here. Next you'll want a reference for the 6502's instruction set. I like this myself. If you're still learning, however, you'll want something more than the aforementioned "lite" version, you might want to give this a read before continuing. As long as you have at least a basic understanding of low level programming and hexadecimal, you should be fine. In addition, I'll try to explain any colorful terms along the way.
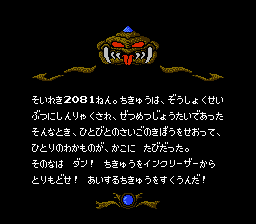
First we're going to need a string that we can get to easily. So fire up the rom in FCEUXD and let the attract mode start (i.e. don't press any buttons). After 3, 2, 1 countdown, you'll see the below string. We're gonna find that.
Next open up the PPU Viewer. What does the PPU Viewer do? It allows us to view the contents of both of the PPU's pattern tables. Basically the pattern tables contain all 512 8x8 tiles (each pattern table contains 256 tiles) available for use at a given time. For a more detailed explanation on pattern tables and their usage, see y0shi's tech document.
What we're looking for is each character's hex value. Since the font's there, just place your cursor over each letter and write them down. I usually go with the first four, which in this case is "1D 11 39 16".

Open up the Hex Editor and select PPU Memory from the View menu. What we're going to do is search for the string of hex values we got from looking in the PPU Viewer. You'll find the string in question at $21A5. One way to check this is to alter a value and see if it changes something. In the screen below, I altered the value at $21A5 by one and the 'se' became a 'so'. That means we're on the right track.
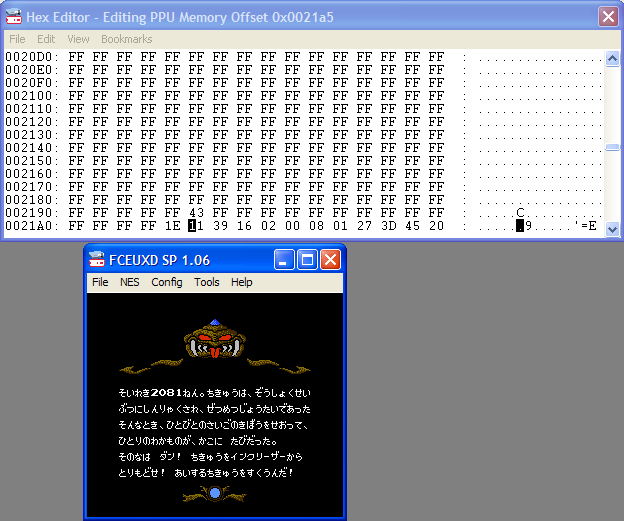
When searching PPU Memory, you can safely begin your search at $2000. $0-$1FFF is where the pattern tables are stored. Starting at $2000 are the name tables. A name table is a fancy word for a tilemap. Each name table consists of $3C0 bytes. Each byte references a tile in the pattern table. When we placed the cursor over each tile in the PPU Viewer, we were getting the number that says "I want this tile to show up on the screen right here". You might see this refered to as tile number from time to time.
Okay, kids, this is the part where things can get confusing. From this address in PPU Memory, we're going to do a little back tracing to discover where the text is getting read from. Got all that? Good.
Now go back to the Hex Editor window (it should still be at $21AD in PPU Memory, unless you've been putzing around with it). We're going to set a Write Break Point to determine when and where this address is written to. Got that?

The Debugger will pop up if you haven't opened it already, so don't freak out and demolish your keyboard (silly German gangstas). Now that we've set up the break point, we're gonna add a conditional to it. Click the edit button and insert "A == #1d" in the Condition box. Conditional breakpoints are only supported in FCEUXD SP. You don't really need them (I did this sort of things for a year or better before I switched to FCEUXD SP), but they make this sort of thing a lot easier.
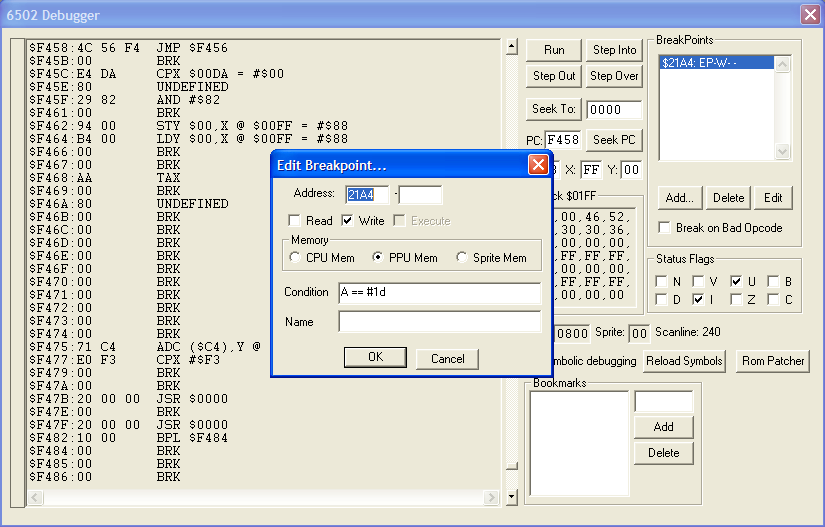
You might be asking yourself what does this mean? Well, it means that whenever a #$1D is written to $21A4 (where the 'se' character shows up), the debugger will "snap" (meaning the game will stop) and we'll be within the routine that writes #$1D (the hex value for "se") to PPU memory. Since we've specified a condition, all writes to this address are ignored except when #$1D is in the accumulator (A). For more information on using conditional breakpoints, check FCEUXD SP's readme.
Now reset the game and let it play until it gets to the string we're messing with. Right before the string is displayed the debugger will snap. In the debugger window, the right window will start at $F689, scroll up a couple of lines and you'll see this:
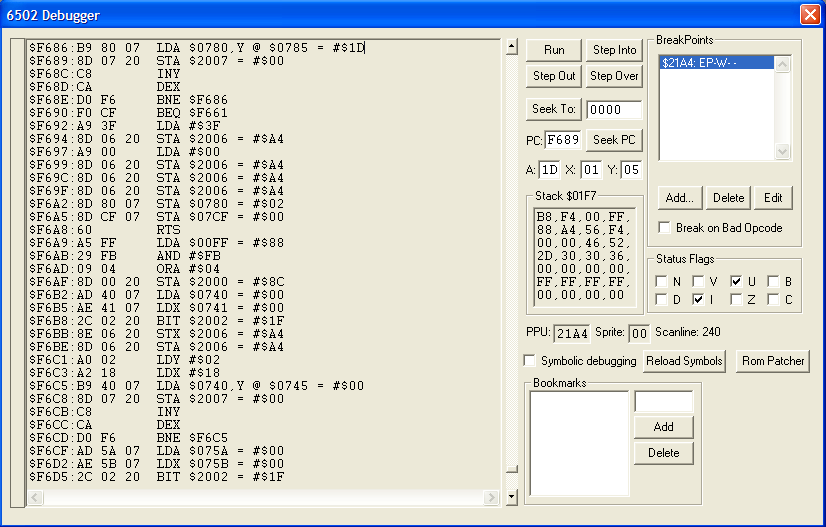
If you know your NES registers, you'll know that $2007 is the PPU Write port. Any data that is written to this address is written to the address written to $2006. If we scroll up in the debugger window to the instruction immediately before "STA $2007", we should be able to see where the data is coming from. Please note, this isn't always the case. Sometimes a value will be loaded and then the routine will branch to the "STA $2007" instruction.
Luckily for us, it looks like it's coming from $0785 in RAM. Now we need to find where and when the data is being written there. Set a CPU Write Breakpoint for $0785. You can do this from the memory viewer like we did before, or from the Debugger window using the "Add" button. If you like, you can add a conditional to this breakpoint too.
Reset the game and come back to the string and the debugger will snap again at $EBF7. Scroll up and you'll see the following:
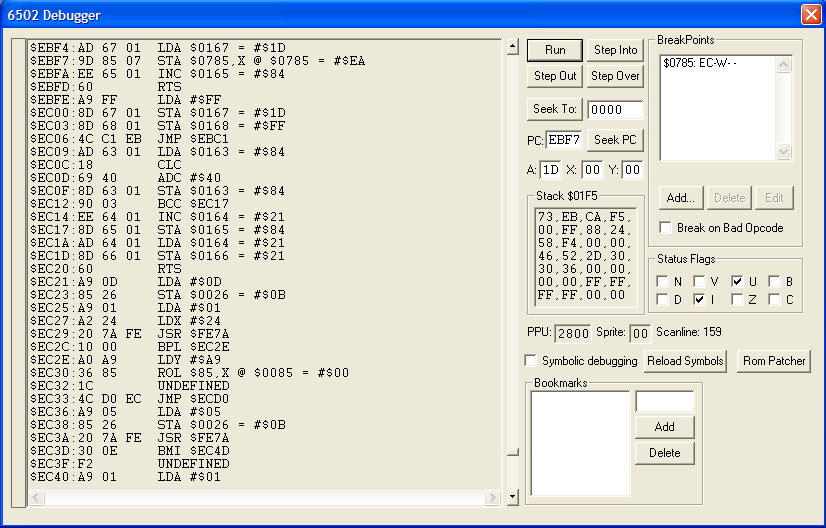
It looks like the value is coming from $0167. Set a breakpoint for that, reset, and repeat. Note: I've deleted the breakpoint for $21AD, because it's no longer needed.
This time around, the debugger will snap inside the text routine at $EB69:
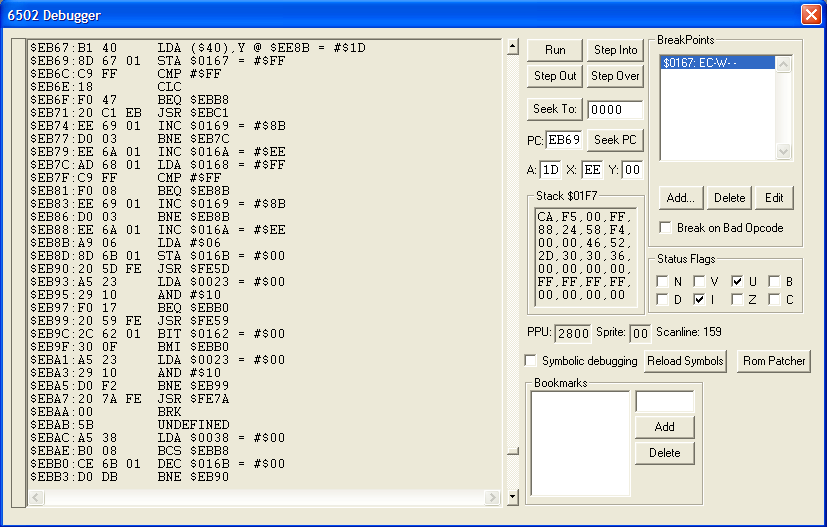
How do I know this is the text routine? Well, if you look at the $EB67, the LDA uses the indirect indexed addressing mode. More often than not, this is the addressing mode used for text routines. That's not to say there aren't other ways to do it, however, just that in my experience this is the most common.
A brief note on how indirect indexed addressing works. I'll use LDA ($40),Y as an example. This is a special way to load a value into the acccumulator. First we go to the address in the parentheses ($40 here). At $40 there will be a two bytes (here #$8B at $40 followed by #$EE at $41. We take those values, flip them to account for the 6502 being big-endian, and we get an address: $EE8B.
Let's plug that into our LDA from before: LDA $EE8B. Now we need to figure out what to do with the Y before we can get a value. Take the value in the Y register (here it's #$00, but could be anything up to #$FF) and add that to our address. So we get this: $EE8B + #$00 (Y) = $EE8B. We grab a byte of data at $EE8B and load it into the accumulator, to get the #$1D we're looking for. Note: Indirect indexed addressing only works with the Y register. You can't do this: LDA ($40),X
Even though I'm fairly certain it is, we still need to make sure that this is the actual routine and not something else. To do this we go to $EE8B in CPU Memory from the hex viewer, right click, and select "Go here in Rom File". You'll end up at $16E9B in the rom. Change the $1D there to $1E. Reset the game and turn off your breakpoints and see if the 'se' is changed to 'so'.
Success! We found not only the text routine but the text as well, all without ever having to use a Relative Search program.
From here we can deduce a few things. Knowing the nature of indirect indexed addressing, we know the pointer to the text is stored at $40-$41. If we wanted to know where the pointer is coming from we could set a write breakpoint for those addresses and find the pointer tabel that way. We can also step through the text routine and look for any places that it branches. These branches sometime indicate control codes like a line break or end of string.
And that's about it. There are a couple other ways to find the text routine that aren't as complicated as this, though. This method does give you some practice in reverse engineering code. Plus, if you ever come upon a game where you can't find the text no matter what, you can always trace back from the PPU writes like we did above.
Hope this helps!
--RedComet