


FTP Walkthrough
What Is FTP?
FTP stands for "File Transfer Protocol". Basically it allows you to transfer files to and from your computer to a remote computer (i.e. one far away). In this case the remote computer is the server your shrine will be on. Using FTP, you can move files between your computer and the website, make subdirectories, delete files, or rename files.
How Does FTP Work?
Let's do a bit of hands-on, shall we? First of all, at RPGClassics we highly recommend the free FTP client "WS_FTP LE (Light Edition)" which can be found here. However, it will work with any FTP client. When you start up the program, here's what you get. (Er, excuse the bad colors, but they're not important. 8p)
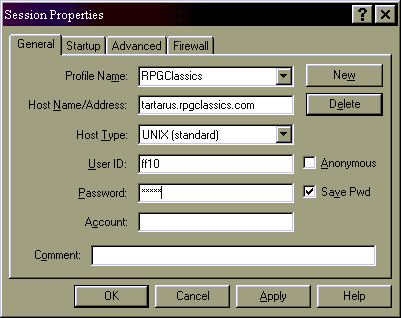
Ignore the other tabs for now. Let's take a look at this important startup information. Click the "New" button to make a new connection, which is what we want to do.
Profile Name: This can be called whatever you want; it's just a name you give your login. Call it something you'll remember. RPGClassics sounds about right, no?
Host Name/Address: This is the server you're connecting to. The server is tartarus.rpgclassics.com. You can copy and paste that if you like.
Host Type: Leave this as it is; don't change it.
User ID: This is the username you were sent when your shrine was reserved.
Password: This is the password you were sent when your shrine was reserved.
For the other boxes: Leave the "Anonymous" box unchecked, and leave the "Save password" checked. That way, every time you log on you don't have to retype your password. When everything's ready, and you're connected to the Internet, press OK. You should get the following screen when you're done.
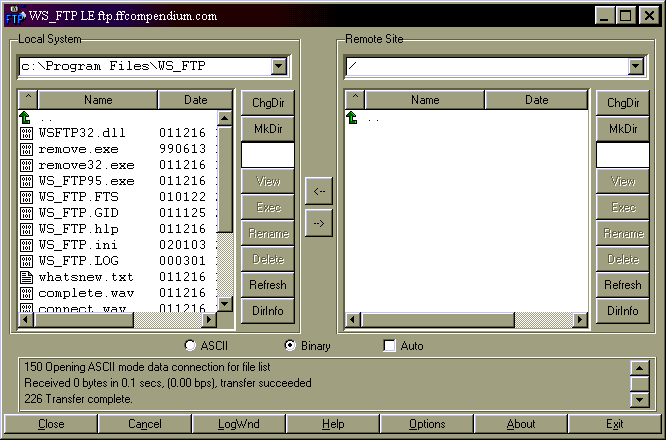
Phew, looks confusing, no? There's a lot of information here, so pay attention.
There are two large boxes here. The one on the left displays files in your own home computer. The one on the right has files on the remote computer (the website). When you first log in, your website won't have any files at all.
The small, long boxes at the upper left and upper right tell you your current directory (folder) on your local and remote computers. To change this directory, press the "ChgDir" button and type in a new directory. Or, you can navigate there yourself by double-clicking the green arrow to go back a directory (e.g. from C:\Program Files\WS_FTP to C:\Program Files) and double-clicking any folders to enter them. However, your remote directory will be "/", the root directory.
You can make new directories by clicking the "MkDir" button. Enter the name of the directory you want to make and voila. You can now enter it by double-clicking the new directory.
To shuttle files between your two computers, use the convenient arrow buttons right smack between the two windows. The left-pointing arrow moves selected files from the remote computer to your home computer; the right-pointing arrows does the opposite. To select more than one file, hold the Control key while clicking their names. You can also select a whole group of files (in order) by clicking the first one you want, then holding the Shift key and clicking the last one you want. Careful! If you (for example) send the file "index.shtml" from your computer to the website, it will overwrite the version of "index.shtml" that might have already been on the website before. Be careful not to hit the wrong direction button by mistake! ^^;
You can re-order the files as well. See the little tabs above the windows? The "^" sorts by extension, the "Name" sorts by filename, and the "Date" sorts by date. You can also click any of those twice in a row to change the sorting from smallest-up to largest-down.
To delete any file, just select it (or more than one file) and click the Delete button. Same if you want to rename it; just select them and click Rename, then enter the new name(s). I actually find that this is a great way to rename files on your own computer quickly. ^^;
Clicking the "DirInfo" button will popup a text file with the list of files and information about them (sizes, dates and so on). You can save the text file if you want.
"View" and "Exec" let you view and execute the files, respectively. You probably won't need to use those buttons at all.
One last thing: the type of upload (denoted by the radio button below both windows) should *always* be in Binary, not Ascii or Auto.
You can click the Options button at the bottom of the screen for a few neat options which I find useful.
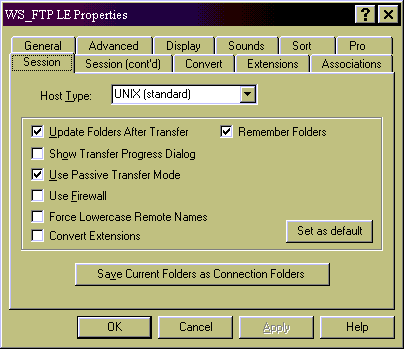
I'll only go through the important ones.
Update Folders After Transfer: I have a slow Internet connection, so I turn this off. That means that whenever I change a file on the remote server, it doesn't reload the whole file list again.
Show Transfer Progress Dialog: I always turn this off. If you leave it on, the program will keep trying to tell your computer that it's active instead of whatever program you're actually using. O_o For example, if you're trying to write something on Notepad while sending files on FTP, you'll keep getting stopped by the FTP program. If you turn it off, it'll be nice and run in the background. -_- If you still want to see how far your file transfer has progressed, little numbers representing bytes transferred will appear in the lower left or lower right while you're transferring files.
Remember Folders: Keep this checked; this means that if you go back to a folder you've already been to, it doesn't have to reload it again.
Save Current Folders As Connection Folders: Before clicking this, change your home directory to wherever you store your shrine's files. Then click it. Now, whenever you connect, you'll automatically go to that folder on your home computer! Very useful.
That should do it! If there are any questions, let me know!